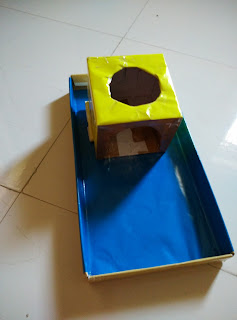
I was digging through my old photos, the time when I had not started to document my motherhood & Montessori journey through this blog. And I found this DIY Montessori Permanence Box that I introduced to my son when he was 9 months old. How time flies, he is now 25 months old!
What Is A Montessori Object Permanence Box?
The object permanence box is found in a Montessori environment for infants & toddlers. It is introduced when they are able to sit up without assistance, usually around 8 to 12 months. The aim of this material is to help them develop their sense of object permanence - which means that if an object is out of sight, it does not mean it does not exist. That is the reason why peekaboo is played too.
Swiss psychologist Jean Piaget believed that the development of object permanence, or the ability to understand that objects exist even when not seen, is one of an infant’s primary developmental accomplishments.
This material indirectly also develops focus & concentration, improves their whole hand grasp, and works on fine motor skills too. They learn hand-eye coordination.
Why DIY?
Montessori materials are awesome but they are expensive most of the time because they are wooden mostly.
I have made a lot of DIY Montessori inspired learning materials for my son, including this DIY Montessori Permanence Box. It is super simple!
Materials Needed
- Cardboard box
- Colored papers (optional)
- Adhesive
- Scissors or a cutter
- Ball
I took a small cube shaped cardboard box and cut a hole according to the size of the ball I had. I also made a door kind of opening on another side of that cube. And then I stuck this cube on to another cardboard tray (it was the lid of a shoe box). I pasted colored papers to make it look attractive.
How To Present The Material? (Source HERE)
1. Put the work mat in place and put the object permanence box on the work mat so it will be in front of the child. Encourage the child to help.
2. Sit facing the child with the work mat between you.
3. Name the box and the ball: “This is the box. This is the ball.”
4. Slowly and deliberately place the ball in the hole.
5. When the ball rolls to a stop in the tray, smile and pick it up.
6. Repeat the action.
7. Invite the child to place the ball in the hole.
8. Once the child begins putting the ball in the hole, quietly move aside and allow her to work undisturbed.
9. When finished, invite the child to put the materials away on a low shelf so she may work with them again when she wishes.
Unfortunately, I could not find any pictures of my son using this material in my archives :( But I remember how happy he was exploring this material, which included eating it too! At that age, they are mouthing everything around them!
"One test of the correctness of educational procedure is the happiness of the child." - Maria Montessori
I would love to know what DIYs have you done for your child? :)
Happy Parenting!


No comments:
Post a Comment